
You insert the SD card into your camera and wait for the familiar thumbnails to appear. Instead, the gallery is empty, the laptop asks you to format the card, or the card doesn't appear at all. The first reaction is usually to try another device, click a repair prompt, or take one more photo to test it. Don't. Those quick reactions can turn a recoverable problem into permanent data loss.
Data recovery from an SD card is safest when you treat the card as evidence, not as a device to troubleshoot by trial and error. Stop writing to it, identify the symptom, and choose a recovery path based on whether the problem is logical, controller-related, or physical. This guide gives you that decision process, from safe home recovery to Singapore professional services, while keeping privacy and responsible device handling in view.
Table of Contents
- The Moment Your Card Goes Silent
- First Things You Should Never Do
- Reading the Symptoms Before Touching Anything
- The DIY Recovery Workflow That Actually Works
- Where DIY Recovery Stops Helping
- What Professional Recovery Really Involves
- Choosing Your Next Move and Protecting What You Get Back
The Moment Your Card Goes Silent
It often happens during an ordinary review. You return from a holiday shoot, insert the card into your laptop, and hear the reader connect. The folder opens, but yesterday's photos aren't there. You try the camera again, then a phone, then another reader. Each attempt produces the same blank gallery or error message, and the worry grows with every click.
That moment doesn't tell you whether the files are gone. A damaged file system can hide perfectly recoverable photographs. A failing controller can prevent the host device from translating the card's stored data. A faulty reader or dirty slot can create the same apparent failure without damaging the card at all.
The first hour matters because every write can occupy space previously used by deleted or missing files. A camera may create new directory information. Windows may offer to initialise the card. A phone may repeatedly attempt to mount or repair it. The correct response is controlled and reversible, not persistent experimentation.
Practical rule: Treat a silent card like a fragile original. Preserve it first, diagnose it second.
A useful overview of what data recovery involves can help put the process in context, but your immediate action is simpler. Remove the card, keep it out of recording devices, and note exactly what happened before the failure. Was the card removed during a write? Did the camera lose power? Did the computer show the correct capacity? Those details help separate a file-system incident from a hardware fault.
Singapore has a real need for this kind of service. A 2024 Proofpoint data-loss landscape report found an average of 13 data-loss incidents per organisation in Singapore during the previous year, with 68% identifying careless users as the main cause. Portable cards sit directly in that user-controlled part of the storage chain, so accidental deletion, unsafe ejection, and handling mistakes deserve a calm recovery plan.
First Things You Should Never Do
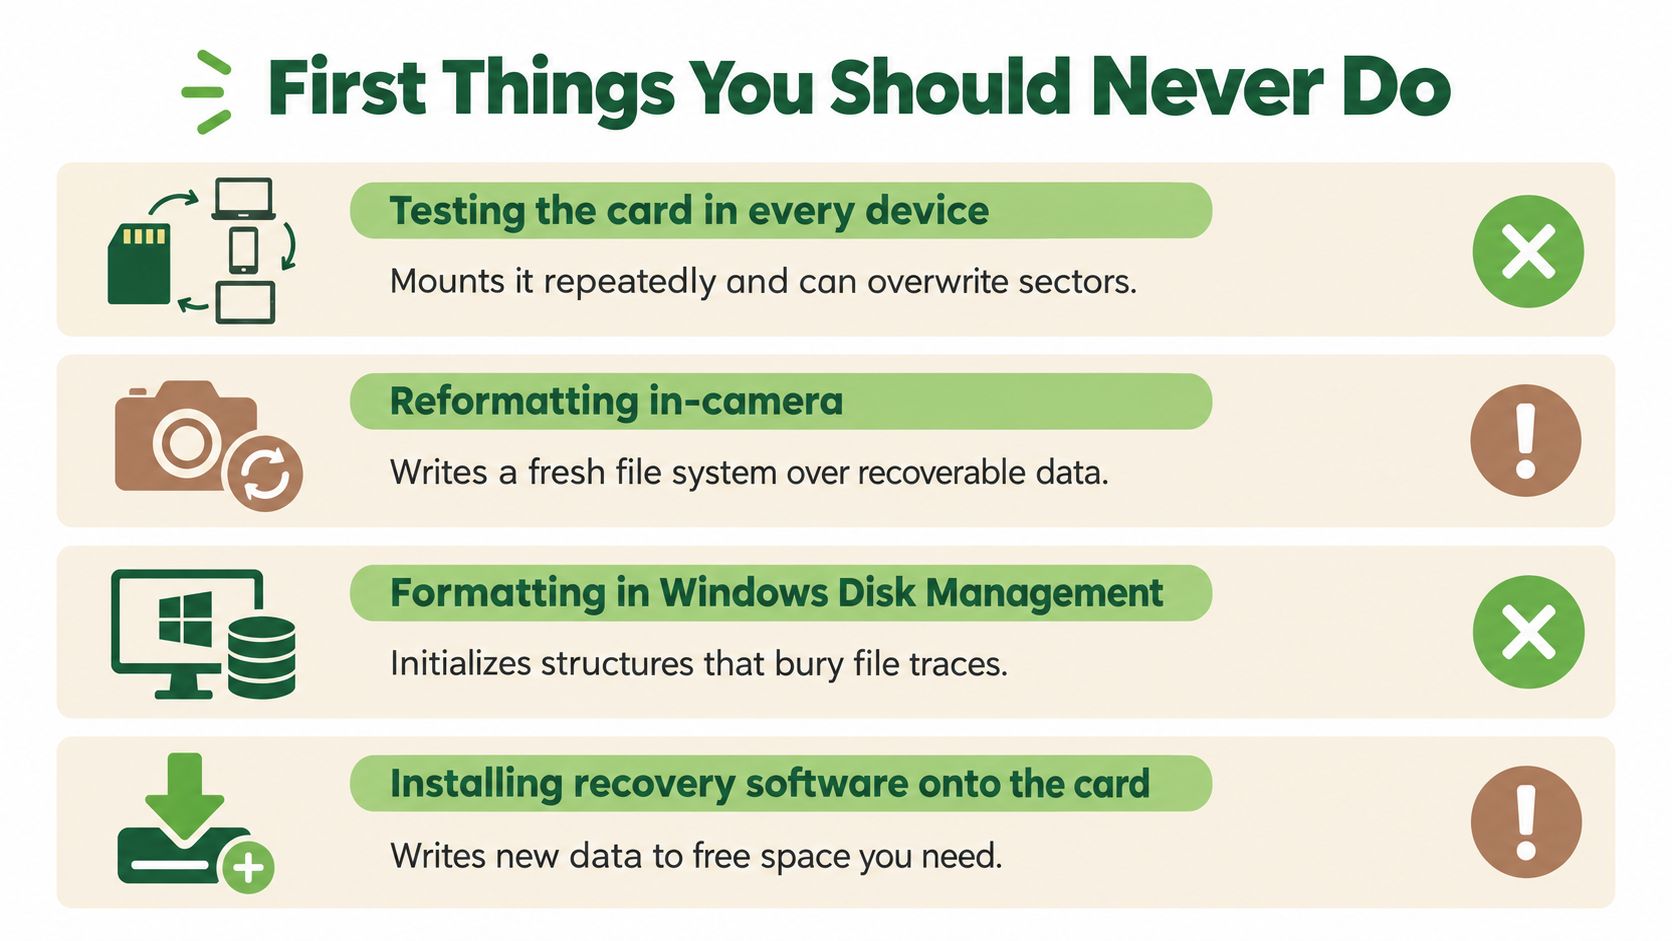
The fastest way to protect an SD card is to stop making changes to it. Don't keep testing it in cameras, phones, tablets, laptops, and readers because one more connection feels harmless. A healthy reader can usually read without changing the card, but devices may still mount, index, repair, or write to removable media.
Never accept a format prompt while recovery is still the goal. Windows may say, “You need to format the disk before using it,” while a camera may offer to format a card it can't understand. Formatting can replace the file-system structures that help recovery software rebuild folders and filenames.
Protect the original before troubleshooting
Avoid repair utilities such as chkdsk, fsck, or automatic “scan and fix” functions on the original card. They are designed to make a volume usable, not to preserve every fragment for forensic recovery. If the card contains important files, a repair that changes metadata can make later reconstruction harder.
Also keep recovery software and recovered files off the SD card. Install tools on the computer's internal drive and export results to a separate drive. If you're preparing an old phone for resale rather than recovering its card, a separate guide on how to wipe your phone before trading covers secure device preparation, but wiping is the opposite of recovery. Don't confuse the two jobs.
A reader problem is the one harmless possibility worth checking. Use a known-good USB card reader and a different computer, make the test once, and observe whether the card is detected consistently. Don't turn that check into repeated reconnect cycles.
If a recovery action isn't demonstrably read-only, don't run it yet.
Finally, label the card and place it in a clean protective case. Handle it by the edges, keep it dry, and don't bend the plastic. No more photographs, formatting, repair, or software installation on the card.
Reading the Symptoms Before Touching Anything
The card's behaviour tells you which recovery path is sensible. A logical fault means the computer can communicate with the card but can't interpret its file system. Accidental deletion, a quick format, a RAW prompt, missing folders, and corrupted filenames commonly belong here.
A controller or NAND-level fault is different. The controller is the small chip that translates the computer's requested logical blocks into locations on the flash memory. If it fails, the memory may still contain data, but ordinary software can't address it reliably.
Match the message to the fault class
| Symptom on Host or Camera | What It Usually Means | Likely Fault Class | Safe Next Move |
|---|---|---|---|
| Files disappeared but the card opens | Directory or allocation information is damaged, or files were deleted | Logical | Stop writing and create an image before scanning |
| Windows says “You need to format the disk before using it” | The operating system can't read the file system | Logical, unless detection is unstable | Cancel the prompt and image the card |
| macOS says “The disk you inserted was not readable” | macOS can't interpret the volume structure | Logical or controller-related | Cancel initialisation and test once with a known-good reader |
| Card appears as RAW | The volume is present but its file system isn't understood | Logical | Run a read-only scan on an image |
| Camera says “Card cannot be read” | The camera can't mount the card | Logical, reader-related, or controller-related | Remove it and test through a computer reader |
| Camera says “Write protected” | The reader may be seeing the physical lock position | Reader or card-lock issue | Check the lock switch without formatting or repairing |
| Card is detected with the wrong capacity | The controller may be reporting bad translation information | Controller or firmware | Stop using it and seek professional assessment |
| Card disconnects repeatedly | Communication or controller instability is interrupting reads | Controller or physical | Power it down and don't rescan repeatedly |
| Card is hot, cracked, bent, or corroded | Electrical or physical damage may be present | Hardware | Don't power it again. Send it to a lab |
Linux users may see read errors in dmesg, while Windows and macOS tend to present friendly prompts that conceal the same underlying problem. The practical classification rule is firm: if the host sees a stable card volume, a logical recovery attempt may be reasonable; if it can't see a usable volume, treat the card as a hardware job.
Don't interpret “RAW” as “empty”. It means the host can't read the file system. Conversely, a card that mounts briefly isn't automatically safe. Instability is a warning that the controller or flash translation layer may be deteriorating.
The DIY Recovery Workflow That Actually Works
DIY recovery is appropriate when the card is physically intact and a computer detects it consistently. The safe method is not to scan aggressively on the original. It is to create a block-level copy, preserve the card, and conduct every experiment on that copy.
Build a recovery copy first
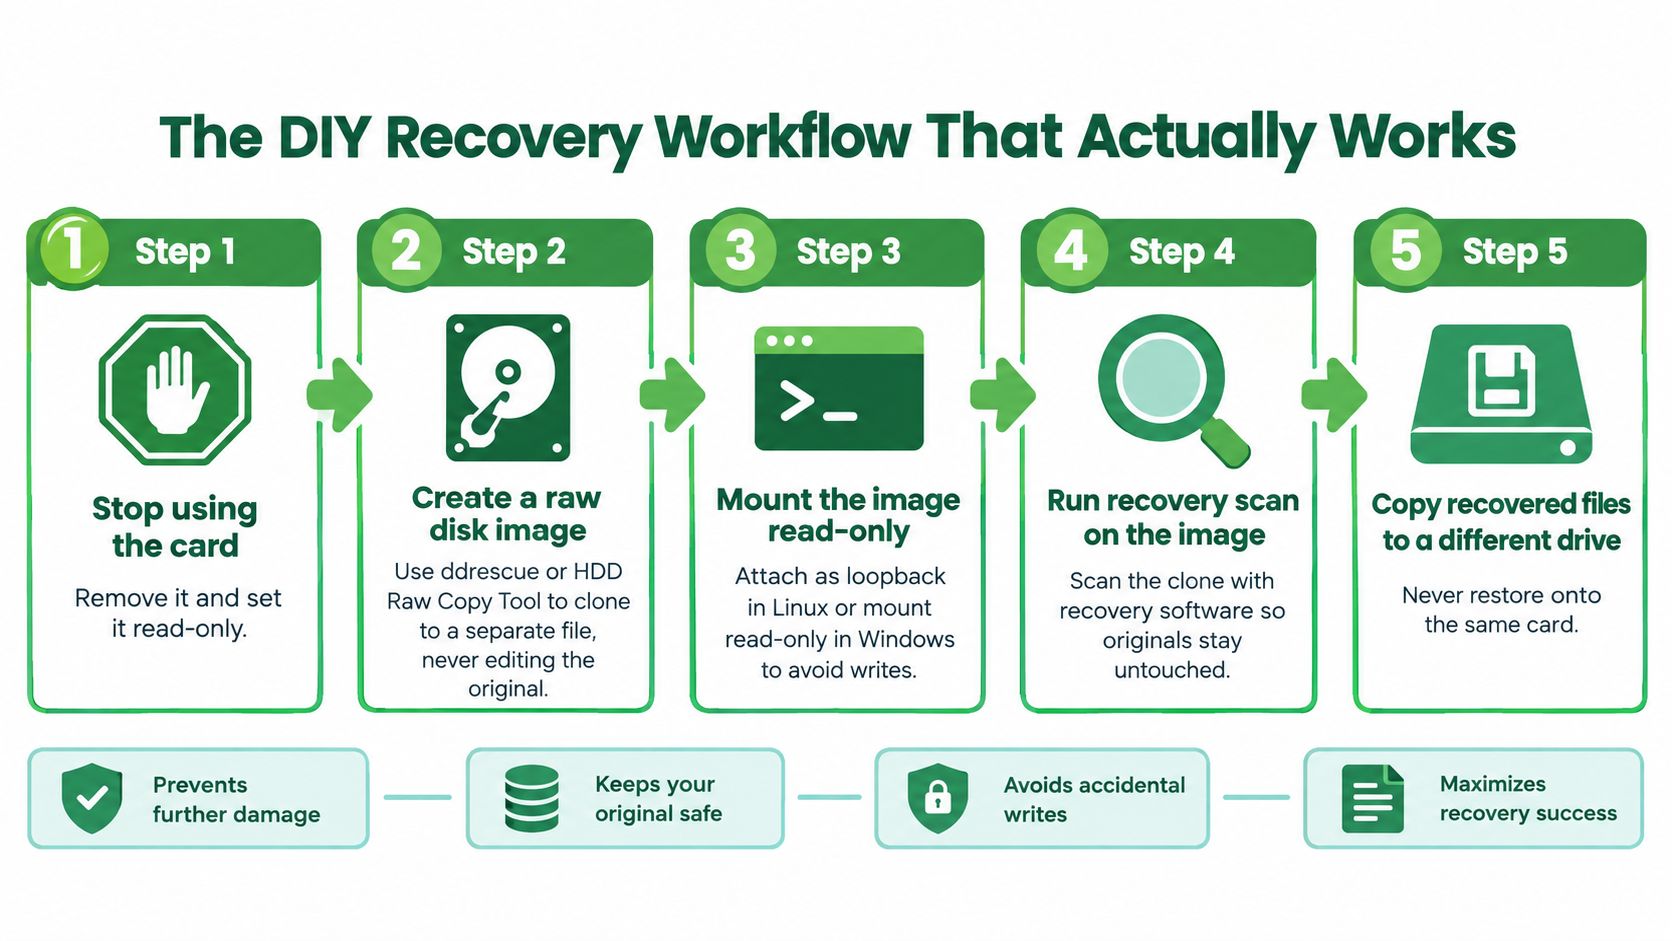
- Remove the card from the recording device. Set it aside and avoid further writes.
- Use a dedicated reader. A USB reader connected to a computer is preferable to connecting the camera or phone as an intermediary.
- Create a raw disk image. On Linux or macOS,
ddrescuecan handle read errors more safely than a basic copy. On Windows, HDD Raw Copy Tool can create a sector-level image. Save the image to a separate drive with enough free space. - Keep the original untouched. Don't format, repair, mount for writing, or save recovered files back to it.
Scan the image, not your memories
Mount the image read-only. Linux users can attach it as a loopback device with write protection. Windows users should use a forensic or read-only mounting option where available. The objective is simple, no recovery tool should be able to modify the source image or the physical card.
Use tools according to the type of recovery needed:
- File-carving tools, such as PhotoRec, search for known file signatures and can recover photos, documents, and some video even when directory structures are damaged.
- File-system-aware tools, such as R-Studio or DMDE, can be useful when the allocation structure is partly intact and you want to preserve folders and filenames.
- Windows-focused utilities, including Recuva, can be suitable for straightforward deleted-file cases, but only when used against the image or a confirmed read-only source.
Start with a scan that can inspect the full image. Large video files may be fragmented, so a list of recovered filenames doesn't prove the videos will play. Check representative files from the beginning, middle, and end of the recovered set.
Play the recovered video on a separate computer if possible, and open photographs at full resolution rather than relying on thumbnails. Export everything to a clean drive. Use checksum tools to record file integrity, keep a recovery log, and note which folders or file types are missing. That record matters if a professional lab later needs to continue from your work.
For a broader workflow involving removable storage, myhalo's guide to data recovery from a USB drive covers the same preservation principle from another angle.
Where DIY Recovery Stops Helping
Software can interpret a readable card. It can't repair a failing controller, reconstruct every damaged translation table, or make unreadable NAND reliable. Many home attempts go wrong here. A scan appears to find some files, so the user keeps rescanning, switches tools, and repeatedly reconnects the card until the remaining data becomes less accessible.
Flash media also behaves differently from a traditional hard disk. Wear levelling spreads writes across physical cells, while the controller maintains a private map between logical block addresses and NAND locations. If that map is corrupted, the operating system may see the wrong capacity, no volume, or inconsistent sectors even though portions of the original data remain on the chips.
The failure modes that matter
| DIY Pitfall | What It Actually Does |
|---|---|
| Repeated rescans on an unstable card | Increases power-on and read activity while the controller is already struggling |
Running chkdsk or fsck on the original |
Rewrites file-system metadata and can remove structures a lab could use |
| Repairing a partition table in place | Replaces evidence instead of preserving the original layout |
| Treating partial results as a complete recovery | Can hide fragmented, missing, or corrupted files |
| Continuing to record because the card mounts | Writes new data over blocks that may contain deleted material |
| Repeatedly changing readers and devices | Adds connection cycles without solving a controller-level fault |
Flash-specific behaviour can also make recovery less predictable after repeated power cycles. Wear levelling and internal error correction mean that a card's logical view isn't a simple, permanent map of physical cells. If bad blocks are spreading, each new read attempt may produce more instability rather than more useful information.
Stop when the card becomes intermittent. A partial scan isn't permission to keep stressing the original.
A professional lab may need the card's original metadata, controller behaviour, and raw NAND layout. In-place repairs can destroy precisely those clues. If the files are irreplaceable, or the card is physically damaged, skip software and use a specialist.
Online recovery services can be convenient, but you must understand where files are uploaded and how privacy is handled. The online data recovery guidance is useful when comparing that route with local, hands-on assessment. For personal photographs, client footage, legal documents, or confidential work, I favour a recovery path that keeps the original media under controlled custody.
What Professional Recovery Really Involves
Professional recovery starts with restraint. A reputable technician records the card's condition, asks what happened, checks the reader and electrical behaviour, and performs diagnosis before quoting the job. Singapore providers describe a non-destructive process that can include evaluation, a quote before work begins, and imaging the card before analysis, as outlined by 3verhigher's recovery service.
The recovery tiers
For a logical failure, the lab may create a stable image and work with file-system reconstruction or signature-based extraction. This is the least invasive path. If the controller responds inconsistently, engineers may examine firmware behaviour, translation tables, and error patterns before deciding whether the normal interface can be used.
Chip-off recovery is reserved for cases where the normal card interface can't expose the data. Engineers remove or access the NAND flash memory, read its raw contents, and reconstruct the controller's work. That reconstruction may involve error correction, scrambling, page layout, and logical mapping. A raw dump alone isn't a finished recovery.
Specialised platforms such as PC-3000 Flash can help a lab interpret flash media that ordinary software doesn't recognise. They don't turn every failed card into a guaranteed success. Encryption, severe NAND degradation, unsupported layouts, or missing translation information can still limit the result.
| Recovery Tier | What It Handles | Indicative Cost (SGD) | Typical Turnaround |
|---|---|---|---|
| Logical recovery | Deleted files, formatted cards, readable RAW volumes | Roughly S$300 | Often within several working days |
| Controller or firmware assessment | Wrong capacity, unstable detection, repeated disconnects | Quoted after diagnosis | Several working days, depending on behaviour |
| Chip-off and NAND reconstruction | Cards that normal interfaces can't read, where the NAND remains usable | Roughly S$1,500 or more | Often longer than logical recovery |
| Physical damage assessment | Cracked, bent, corroded, or water-exposed media | Quoted after inspection | Depends on the electrical and NAND condition |
These figures are indicative Singapore ranges, not promises. Local providers also publish different paths for software and hardware cases, including one Singapore source that describes 1 to 3 working days for file-system issues and 10 to 14 working days for physically damaged cards, while another lists a broad S$200 to S$950 range without the same self-triage detail. Read the quote carefully and ask what happens if no usable files are recovered.
A trustworthy lab should explain whether it offers no-data, no-fee terms, how sensitive files are handled, whether an NDA is available, and how the media moves through intake, diagnosis, recovery, and return. Ask for a written report that distinguishes recovered, partially recovered, and missing files. If you also need mail-in iPhone data recovery, the same questions about custody, privacy, diagnosis, and delivery apply.
Choosing Your Next Move and Protecting What You Get Back
The right decision depends on what the card does, not on how valuable the card itself is. A cheap SD card can hold irreplaceable family photos or work footage. Treat the value of the data as the deciding factor.
Use this symptom-to-action guide
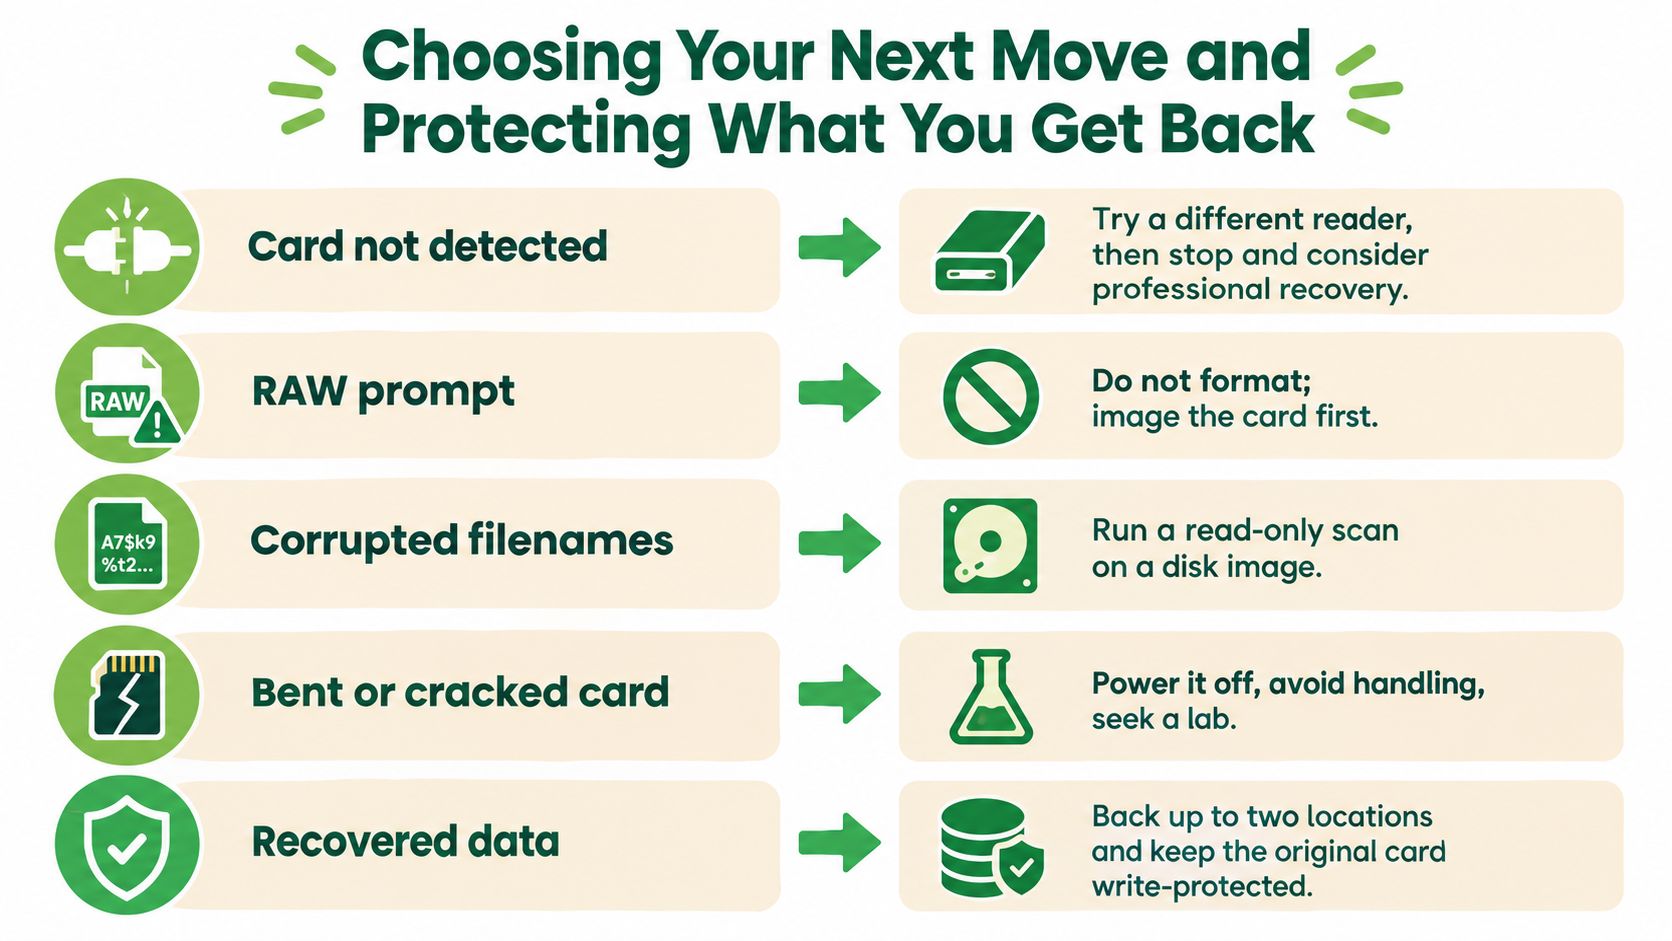
- Card opens and shows folders: Stop writing, create a raw image, and scan the image with PhotoRec, R-Studio, DMDE, or another read-only workflow.
- RAW prompt or format request: Cancel it. The volume may still contain recoverable data, so image the card before scanning.
- Corrupted filenames or missing directories: Work from an image and try file-system analysis before file carving.
- Card isn't detected, shows the wrong capacity, or disconnects: Stop software attempts. These signs point towards controller or firmware trouble.
- Bent, cracked, wet, hot, or burnt-smelling card: Don't power it on again. Put it aside and contact a specialist.
- Only copy of essential files: Skip DIY even if the card mounts. A lab removes the risk of your experiment changing the original.
Handle recovered files as carefully as the card
Recovery isn't complete when filenames appear in a folder. Open representative photographs, play recovered videos, and check documents for missing pages or corruption. Record what was recovered and keep the original card write-protected until you've confirmed the result.
- Use separate storage: Copy recovered data to a clean drive, not back to the SD card.
- Make another backup: Keep an additional copy in a different location before you wipe or reuse anything.
- Protect sensitive material: Encrypt confidential work files and personal media on the destination drive.
- Quarantine the original: Don't format or discard the card until the recovered files have passed your checks.
- Reuse only after confirmation: If you decide the card is still trustworthy, reformat it in the device that will use it. Replace it if the failure was unexplained or repeated.
A second copy is the cheapest insurance. The Singapore-specific data recovery and backup guidance can help you build a routine that makes the next card failure less disruptive.
myhalo provides data recovery support for memory cards and other failed devices, alongside secure data handling and responsible device lifecycle services in Singapore. Your precious files and memories matter to us. Whether you need to protect your privacy with Safe Data or rescue lost files with Save Data, visit myhalo and reach out to the caring team before you try another risky repair.