Your iPhone probably holds more of your life than you realise. Family photos, WhatsApp chats, Notes, saved passwords, banking apps, work files, school forms, and those little screenshots you swear you’ll sort later. If you’re reading this because your storage is full, your phone is acting up, or you’re about to upgrade, you’re already at the right moment to protect everything properly.
A lot of people think backing up iPhone data is a chore for “later”. Then later becomes the day the phone won’t switch on, the screen cracks badly, or it’s time to hand the device over for repair or trade-in. A backup turns that stressful moment into a manageable one. Instead of worrying about losing your memories, you can move forward calmly.
The good news is that backing up iPhone data isn’t complicated once you understand what’s happening. You’ve got two main paths. You can use iCloud for convenience, or your computer for speed and control. The smartest approach is knowing how to back up, how to verify it worked, and how to safely clear your device before you let it leave your hands.
Table of Contents
- Why Backing Up Your iPhone is Your Digital Safety Net
- The Easiest Method Backing Up with iCloud
- For Full Control Backing Up to Your Computer
- Verifying Your Backup and Avoiding Common Pitfalls
- The Ultimate Pre-Repair and Trade-In Checklist
- Your Data is Safe Now What
Why Backing Up Your iPhone is Your Digital Safety Net
Your iPhone slips out of your hand, the screen goes black, and your first thought is not about the device itself. It is about your photos, chats, notes, passwords, and all the little pieces of daily life stored inside. That is why a backup matters. It gives you a copy of what makes your phone feel like yours.
Apple explains that a backup saves the information on your iPhone so you can restore it to the same device or move it to a new one later. In simple terms, your backup is the spare key to your digital home. If the original gets lost, damaged, repaired, or traded in, you still have a safe way back in.

What a backup saves
This is the part many iPhone users find confusing.
A backup usually includes your personal data and settings, such as messages, photos, device preferences, Home Screen layout, health data, and app data. It does not usually store the full app files themselves in the way people picture a perfect photocopy. During a restore, your iPhone pulls the apps back in, then reconnects them with the data from your backup.
That is why backup size can look smaller than the storage used on your phone. Smaller does not mean incomplete. It often means the backup is saving the parts that matter most, while the apps themselves are downloaded again later.
Practical rule: Judge a backup by whether it can restore your important data, not by whether the file size looks huge.
Why this matters in Singapore
In Singapore, phones move through a full lifecycle quite quickly. People repair them, replace them, pass them to family members, or trade them in for an upgrade. A backup protects you at every stage of that journey, not only on the day something goes wrong.
That bigger picture matters. Good backup habits are not just about recovery after a cracked screen or failed update. They also make it safer to prepare your iPhone for repair, reset it properly before a sale, and hand it over with confidence. That is a big part of real data safety. You are protecting your memories first, then protecting your privacy when the device leaves your hands.
Emotionally, a backup buys peace of mind. You are no longer one accident away from losing years of photos or important conversations. You have a safety net in place, and that makes every repair, upgrade, or trade-in feel much less stressful.
That is the win. Your data stays with you, even when your iPhone does not.
The Easiest Method Backing Up with iCloud
If you want the least fussy option, iCloud is the one many users find themselves loving. Once it’s set up properly, it can operate smoothly in the background while you get on with life.
Cloud backups have become normal behaviour for phone users. Nearly 80% of smartphone users rely on cloud storage, and Apple’s 2024 security updates improved protection for iPhone backups stored in the cloud, as discussed in the overview of cloud storage for iOS users in Singapore. For everyday users, that means convenience doesn’t have to come at the expense of safety.
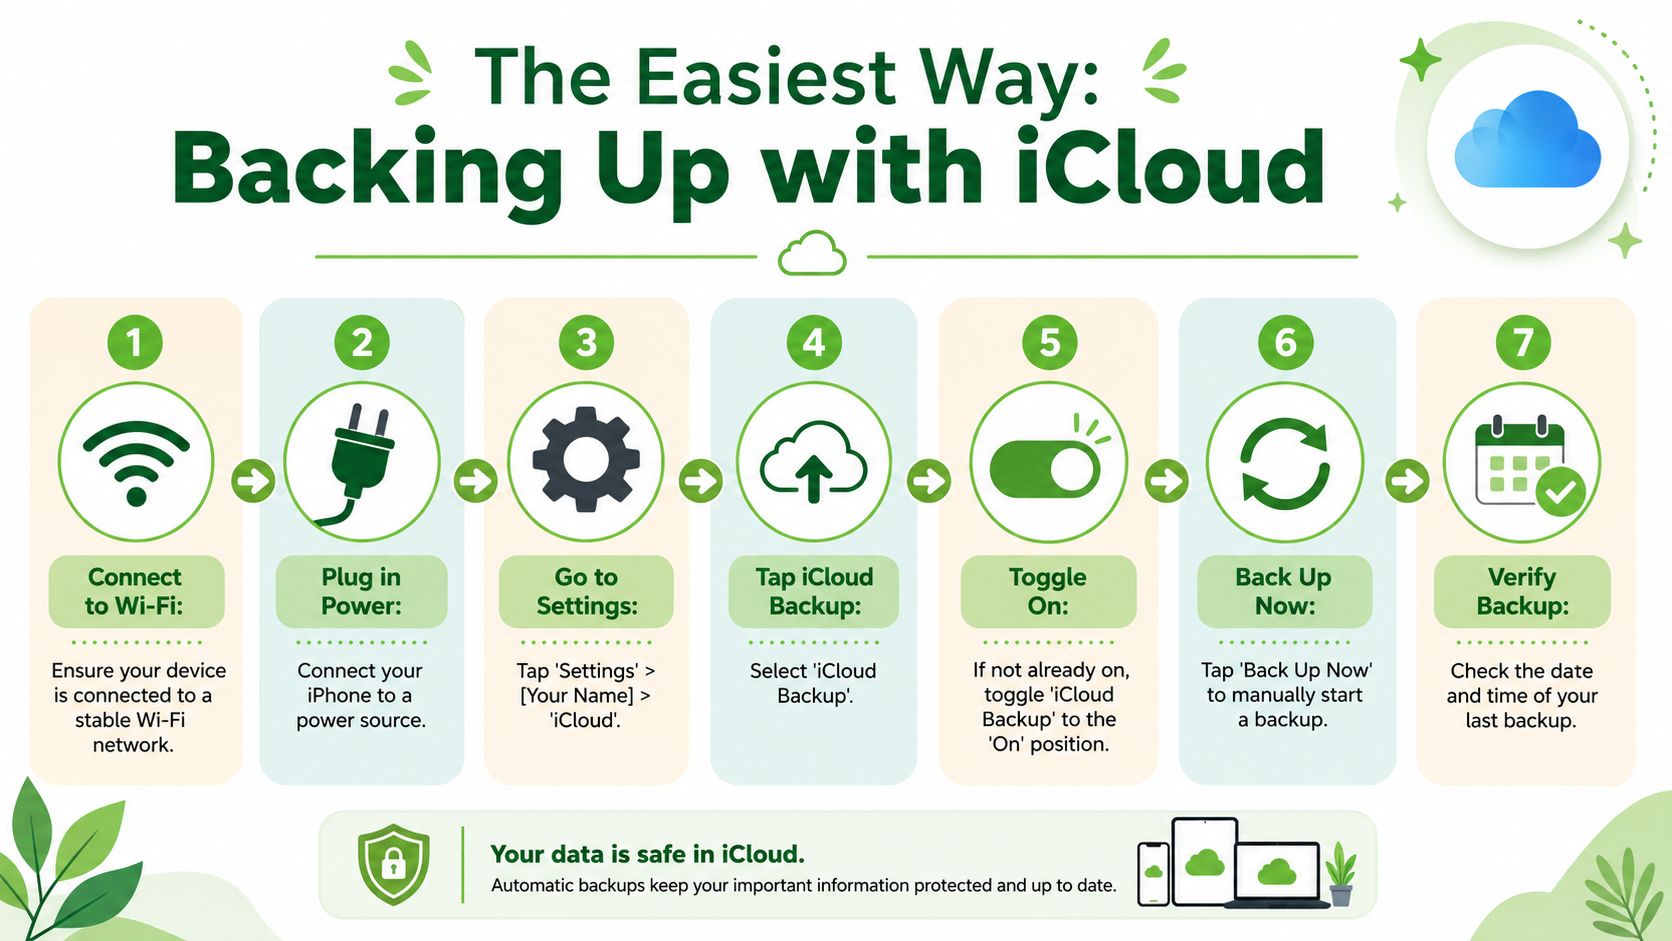
How to switch on iCloud Backup
Follow these steps on your iPhone:
- Connect to Wi-Fi. iCloud backup works best on a stable network.
- Plug into power. This helps the phone complete the backup without draining the battery.
- Open Settings. Tap your name at the top, then tap iCloud.
- Tap iCloud Backup.
- Switch it on. If the toggle is off, turn it on.
- Tap Back Up Now. This starts a manual backup right away.
- Check the time stamp. Look for the latest successful backup time so you know it really finished.
Some readers prefer to watch the flow before tapping around. This quick video makes the setup feel very straightforward.
How to avoid the usual iCloud headaches
iCloud feels magical when it’s working. It feels annoying when it isn’t. Most of the frustration usually comes from a few simple issues.
- Storage accumulates. If your photo library, messages, and app data have grown over time, your plan may no longer fit your device.
- Wi-Fi is too unstable. A backup may start but not finish if the network keeps dropping.
- People assume one successful backup means they’re covered forever. It doesn’t. A backup should stay current.
Here’s a simple way to keep iCloud tidy:
| Check | What to do |
|---|---|
| Backup toggle | Make sure iCloud Backup is still switched on |
| Power | Leave the phone charging overnight now and then |
| Wi-Fi | Use a stable home or office connection |
| Storage review | Remove old app data you no longer need |
| Last backup | Confirm the date is recent |
If you run a small team and like understanding how cloud backup works beyond a single phone, this primer on cloud backup solutions for small businesses is helpful. It explains the same core idea on a broader scale. Your iPhone is personal, but the logic is the same. Store important data somewhere safer than one physical device.
A good iCloud setup should feel boring. That’s the goal. No drama, no guessing, no last-minute panic before a phone switch.
For Full Control Backing Up to Your Computer
Some people want convenience. Others want control. If you prefer seeing the backup happen in front of you, or you need one done quickly before repair, using a computer is often the better move.
A full iPhone backup to a computer using a USB3 connection can take as little as 30 minutes, which makes it much faster than a backup that depends on Wi-Fi stability, according to this guide on how long an iPhone backup can take. That speed is especially useful when time is tight.
Why a computer backup feels different
A local backup has a different personality from iCloud. It sits on your Mac or Windows PC instead of depending on cloud space and network quality.
That can be useful when:
- You need speed. USB3 is usually quicker than waiting for a large wireless backup.
- You want a local copy. Some users feel better knowing a backup exists on their own machine.
- You’re preparing for repair. A direct cable backup is handy when you want to finish the job the same day.
If you’re also planning a move to a different device, this practical guide on migrating your data the easy way pairs nicely with a local backup because it helps you think through the handoff, not just the save.
How to make an encrypted backup
This is the step many people miss. On a Mac, you’ll usually use Finder. On a Windows PC, you’ll typically use iTunes. The screens look a bit different, but the key option is the same.
Use this routine:
- Connect your iPhone with a certified cable.
- Open Finder or iTunes and select your iPhone.
- Choose to back up all data to this computer.
- Tick Encrypt local backup.
- Create a password you’ll remember and store safely.
- Start the backup and wait until it completes.
- Check the latest backup date on the computer before disconnecting.
Why encrypt it? Because an encrypted backup can include more sensitive information, such as saved passwords, Health data, and Wi-Fi settings. It’s the version that gives you a more complete recovery path.
Quick reminder: If you forget the encryption password, restoring that backup can become very difficult. Save that password somewhere secure that you’ll actually be able to find later.
A few practical habits also help. Use a native USB3 port if your computer has one. Avoid dodgy cables, loose adapters, or slow USB hubs when you can. If the phone keeps disconnecting, the backup can fail halfway and leave you thinking you’re protected when you’re not.
Verifying Your Backup and Avoiding Common Pitfalls
Starting a backup is not the finish line. Verification is. This is the part that separates “I think I’m safe” from “I know I’m safe”.
That matters because the backup can exist in theory but fail in practice. In Singapore’s repair ecosystem, encrypted iTunes backups have a 98% data restoration success rate, compared to 92% for unencrypted iCloud backups. The same source also notes that 22% of iCloud backup failures are due to users not upgrading from the default 5GB plan. Those numbers don’t mean iCloud is bad. They mean assumptions are risky.
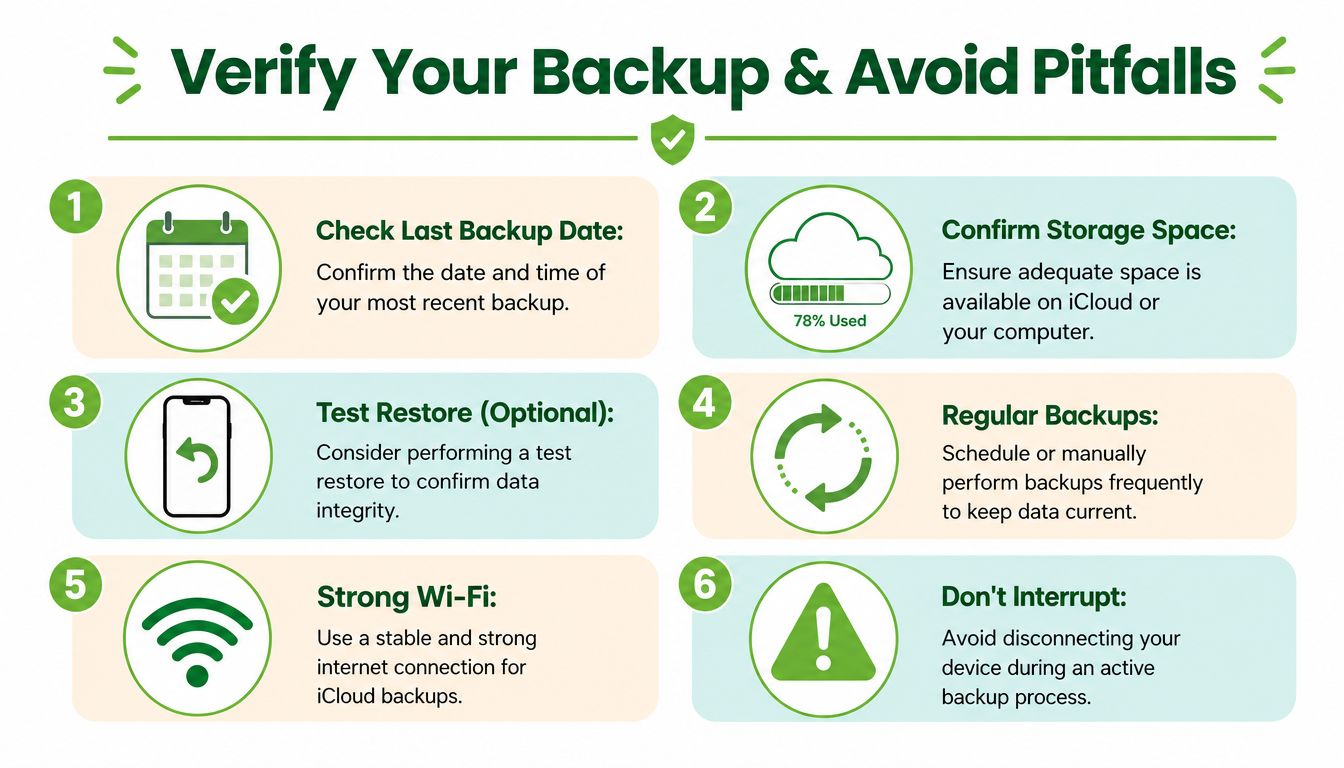
The check most people skip
Verification is simple, but it needs intention.
For iCloud, go to your backup settings and look for the last successful backup date and time. For a computer backup, open Finder or iTunes and confirm the latest backup entry is recent. Don’t just look for the existence of a backup option. Look for evidence that the backup completed.
This is also a smart time to review whether you’ve built any messy habits around storage and recovery. If you want another practical read on why consistency matters, this article about the importance of backing up data gives a useful broader reminder.
The most common reasons backups fail
People usually don’t lose data because they never heard of backups. They lose data because they trusted a backup they never checked.
Watch for these problems:
- Old timestamp: You think the backup is current, but it was done months ago.
- Too little iCloud space: The backup starts, stalls, or never completes fully.
- Interrupted internet: Weak Wi-Fi can break cloud backup progress.
- No encryption on local backup: Important categories of sensitive data may not restore as expected.
- Disconnecting too early: Unplugging the phone before the backup finishes can create a false sense of safety.
Don’t leave the backup screen until you’ve checked the date, the destination, and whether the process completed successfully.
A good verification routine can be very short:
| What to verify | Where to look |
|---|---|
| Last backup time | iCloud Backup screen, Finder, or iTunes |
| Enough storage | iCloud storage settings or free computer space |
| Encryption status | Finder or iTunes backup settings |
| Device stability | Cable connected, Wi-Fi stable, power available |
If you want proper peace of mind, treat verification like locking your front door. The backup itself is only half the habit.
The Ultimate Pre-Repair and Trade-In Checklist
The backup is done. Great. But if your iPhone is about to leave your hands for repair, resale, or trade-in, there’s one more job to finish. You need to separate your data from your device cleanly.
A lot of people assume this happens automatically. It doesn’t. 63% of Singaporeans who trade in devices assume their cloud data is automatically erased, but this is false, according to myhalo’s trade-in information, which also states that the trade-in process includes a 30-point diagnostic check and an ISO-aligned data wipe. That’s a strong reminder that cloud accounts, device access, and physical handover are three different things.
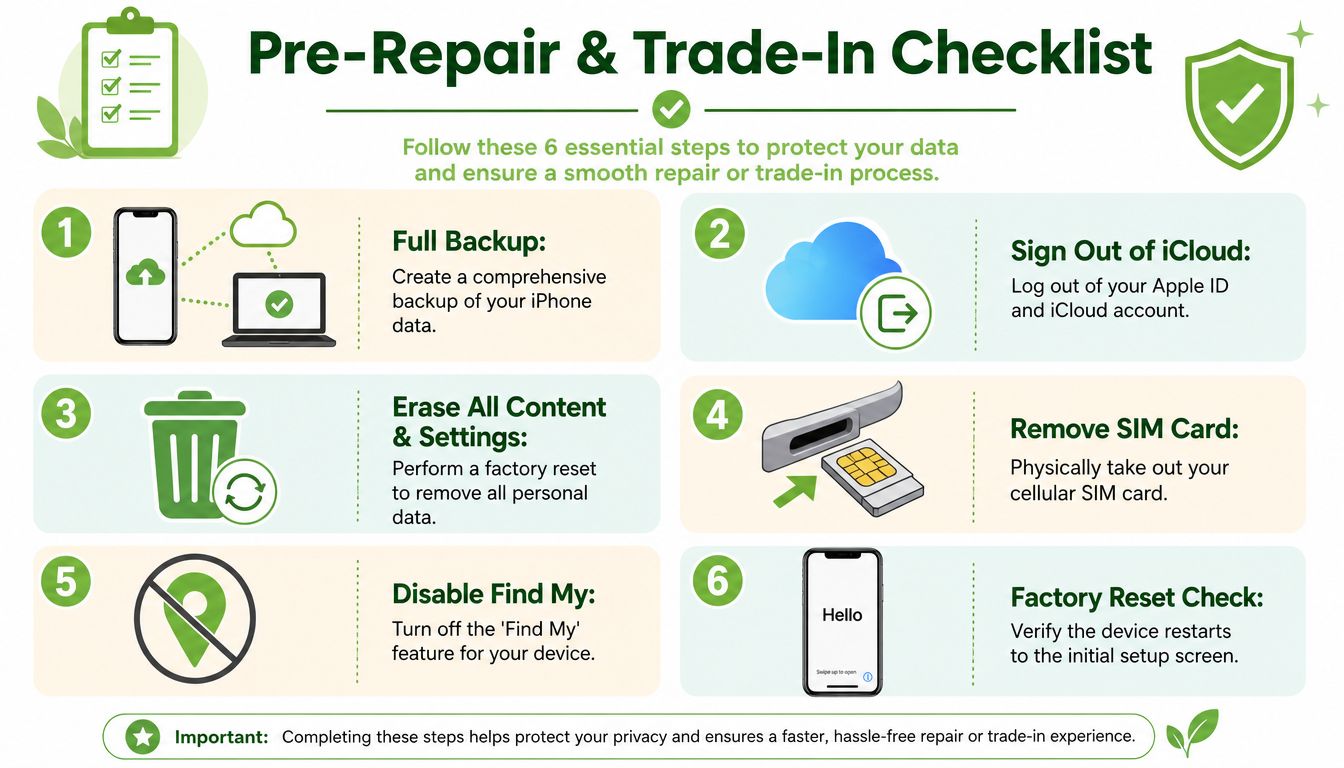
Your final safety routine before handing over the phone
Use this checklist slowly. Rushing this part causes the most avoidable mistakes.
-
Do one final backup
Use whichever method you trust most. Then verify the latest time stamp. If you’re changing phones soon, that final backup is your launch pad onto the new device. -
Turn off Find My
This removes Activation Lock from the device. If you skip this, the next step in the device’s life gets messy fast. -
Sign out of your Apple ID and iCloud on the device
This is different from having a backup in the cloud. You’re disconnecting the phone from your account. -
Remove your SIM card
It sounds basic, but people forget. Keep your number and account details with you. -
Erase All Content and Settings
This performs the factory reset on the device itself. -
Check for the Hello screen
If the phone restarts to the setup screen, that’s a strong sign your personal data is no longer sitting on the device.
For readers who like having an extra checklist before the handover, this mobile-specific guide on what to do before you trade in your mobile phone in Singapore is worth bookmarking.
How to know your iPhone is ready to leave your hands
A safe handover doesn’t mean “I deleted some photos and logged out of one app”. It means the device has been properly detached from your digital identity.
Here’s a quick comparison:
| Action | What it protects |
|---|---|
| Final verified backup | Your memories, files, chats, and settings |
| Sign out of Apple ID | Your account access on that device |
| Disable Find My | Prevents lock issues for the next stage |
| Factory reset | Removes your personal data from the handset |
| SIM removal | Keeps your mobile service under your control |
If the phone is leaving your possession, your goal is simple. Keep your data with you and leave the device empty.
This is also where people get tripped up by cloud misunderstanding. A backup stored in iCloud isn’t the same thing as erasing an iPhone. Likewise, erasing an iPhone isn’t the same thing as managing what remains linked to your account. Think of it as a full data safety lifecycle. First preserve. Then disconnect. Then erase. Then hand over.
That sequence helps whether the phone is going for a screen replacement, battery service, trade-in, resale, or recycling. It keeps the experience calm because you’re not trying to remember critical steps at the counter.
Your Data is Safe Now What
Once you’ve built a proper backup habit, your whole relationship with your iPhone changes. Upgrades feel easier. Repairs feel less scary. Even a lost device feels less overwhelming because your digital life isn’t trapped in one piece of hardware anymore.
That’s also the moment to look at old devices differently. A retired iPhone doesn’t need to sit in a drawer for months while you “figure it out later”. Letting unused tech pile up only adds clutter, mental noise, and more chances to forget what’s still linked to your accounts. If you’ve already protected your data, you’re in a much better position to move that device on responsibly.
If you’re wondering what comes next for older Apple devices, this guide on what to do with old iPhones offers practical next steps. There’s also a real incentive to act. myhalo’s Declutter Your E-Clutter Program offers an immediate S$30 discount when consumers trade-in any unused or non-functional device, according to this feature on the Declutter Your E-Clutter programme.
🌿 The myhalo Promise: We believe that joining the zero e-waste movement should feel good and be completely effortless. Through our Safe data guarantee, your privacy is perfectly protected, while our Declutter your e-clutter program makes recycling your old devices completely convenient, safe, and responsible.
Your precious files and memories matter to us. Whether you need to protect your privacy with Safe data or move on from an old device the responsible way, myhalo is here to help you do it easily, safely, and with peace of mind. Ready to feel lighter and do good? Join the zero e-waste spirit and take the next step today.